Aurora Borealis Outside Amos, Quebec April 2, 2022

Aurora Borealis Over Chemin Joseph-Langlois Around 1:30 a.m. EDT. April 2, 2022

The 25th Solar Cycle began in late 2019/early 2020 and the solar activity is increasing from its 11-year minimum towards a maximum around 2024 to 2025. The past couple months have had several active nights with CMEs and solar storms, but for the most part the weather has been overcast. I happened to be on the outskirts of Amos, Quebec on the night of April 1st going into April 2nd, and it was an active night.

Photographed with a Canon EOS 6D Mark II and 50mm primary. The exposure was 50 seconds at ISO 1600. f/1.8.

Posted in Photography | Tagged , , , , | Leave a comment

Northern Impressions 2.0 Entries

The Timmins Museum: National Exhibition Centre had a call-out for a juried exhibit title Northern Impressions2.0, which was to have been shown in May of 2020. However, with the Covid-19 pandemic, the deadline and show date kept getting pushed back until September 30th for digital submissions, and December 31st for the accepted pieces to be ready for hanging in January.

Sixteen artists from around the region submitted two works of art, all of which were accepted into the show. Unfortunately, just as everything was ready to go, the Province of Ontario issued a lockdown to begin on December 26th, 2020 at 12:01 a.m. Originally slated as a 14-day lockdown for Northern Ontario and 28 days in the South, the lockdown was extended in Northern Ontario until Tuesday February 16, 2021 at 12:01 a.m. (Just after the Family Day weekend.) Timmins, under the Porcupine Health Unit, re-opened as as an Orange Zone – Restrict, whereas the community had been Green – Prevent before the Christmas holidays. By the time everything re-opened, there was another exhibition scheduled in the gallery.

Since the entries were also submitted digitally as photographs, museum staff were at least able to create a virtual exhibit in the form of a slide show video, which can be viewed here: https://fb.watch/3UZBPMBnny/

The Backbone of Timmins: Acrylic on Canvas 24″ X 36″ September, 2020
Hollinger Mine: 110 Years and Counting, Acrylic on Canvas 20″ X 16″ September, 2020

Artist Statement: Karina Miki Douglas-Takayesu

The Backbone of Timmins and Hollinger Mine: 110 Years and Counting are based on observations made when the public viewing area of the Hollinger open pit mine site was opened for preview in late October of 2019.

The Backbone of Timmins was inspired by a comment I overhead by a visitor. In respect of the fact that the underground mine was also where many men lost their lives, I pay homage to them with a stylized reverse silhouette, with the path down into the open pit following the miner’s spine – a proverbial canary sits nearby.

Hollinger Mine… was painted as prop to appear in a brief film segment where I look to be painting en plein air at the mine site.  Our Tourism Department had been successful in nominating Timmins in as a candidate for a video profile for Culture Days 2020. 

Posted in Exhibits | Tagged , , , , , | Leave a comment

“Brightening Up the Night – Iroquois Falls” – Watercolour Selected for the 63rd Annual NOAA Juried Exhibition

From “In Real Life” to Artwork

Canon EOS 60D

(Brightening Up The Night – Iroquois Falls, watercolour on 300-lb cold press paper. Approximately 19″ H X 28″ W, without frame.

Back in December of 2017, I drove out to Iroquois Falls one evening to see the Ontario Northland Holiday train on its “Brighten the Night” tour. Started a few years, the new tradition featured a lit-up train that toured stopped at various communities in Northeaster Ontario, including Moosonee, Kirkland Lake, Cochrane, and Iroquois Falls among others. Children and the young-at-heart watched as the train stopped at a local station or depot, and got to see musical performances by costumed characters, meet Santa Claus in the caboose, and if they were lucky, also get a chance to sit up in the driver’s cab and blast the horn. Each community along the way also had activities, such as roasting marshmallows outside, or raising funds for local charities. Since the Ontario Northlander train to Toronto ceased operations in 2012 with the provincial government divesting the the Ontario Northland Transporation Commission, many children attending the visits likely never seen a train up close in their hometown.

IMG_2569

The night ONR 1809 (an EMD GP38-2 diesel-electric locomotive) arrived in downtown Iroquois Falls in early December, it was around -30°C, but that did not deter families and rail fans from visiting – many, like myself – drove in from Timmins, since our section of the railroad was closed and removed in 1990.

The coloured L.E.D. ropes and the way they reflected on the train and the snow, along with the scene being at night, inspired me to take on the challenge of trying to depict the scene it watercolours – perhaps as first-ever full sheet (22″ X 30″) painting… however, I did not commit to the painting until over a year later.

IMG_9407

The following year, I decided to visit the train again to get some more reference photographs. Again, it was a cold, clear December night, although this time, because of my work schedule, I drove out an hour and a half to Swastika, Ontario, which is about 8 kilometres west of Kirkland Lake. This time, the train had a different colour scheme, most notably at the front of the locomotive, where the bright green lights of the previous year had been replaced with blue and a string of alternating red and green lights, which made the front of the train considerably darker than when seen in Iroquois Falls. A change I liked, though, was that the wreath was now lit up with red and white lights, instead of just the cool white lights in 2017.

IMG_9399

As a bonus, I also got to come inside and have a look in the cab for a few minutes.

TrainIFComposite-001

Since the railroad stop in Swastika sits out by a bridge over the Blanche River and the “skyline” of notable buildings is further back, I decided to base the painting n the train as seen in Iroquois Falls in 2017. In order to compose the scene, I superimposed one of my photographs over a screen shot from Google Street View, which shows Ambridge Drive, approximately where the train stopped.

IMG_0029-001

Additionally, since the wheel trucks were very dark in the reference photographs, I borrowed a friend’s HO-Scale (1:87) locomotive (seen here with an older ONR Livery) to take some more reference photographs in early 2019.

2020-01-10

Over several sessions between late April and mid-May of 2019, I worked on the train painting, beginning with drawing the whole scene on a grid, with each square being 20mm X 20mm. The drawing filled almost at an entire 22 X 30″ sheet of Arches 300-lb cold press paper.

Train Painting 04

Since details of the night sky did not show up in the original photograph, and not many details would be seen in real life, to take some artistic license in creating the background, I used Stellarium, a free, open source, desktop planetarium (and also website), which I could set to simulate the night sky over Iroquois Falls on December 07, 2017 at approximately 6:31 p.m. EST. Using my memory and Google Maps for reference, I also set Stellarium in the approximate direction of the night sky as seen facing to the South/South South West.

After a couple of near all-nighters, I finished the painting in early June and submitted the digital entry through the Porcupine Art Club for the 63rd Northern Ontario Art Association Juried Exhibition, and was delighted to learn that it was selected for the 2019/2020 touring show, which began in Cochrane, Ontario in September of 2019. Cochrane is the starting point of the last ONR passenger train, which goes up to Moosonee – literally “the end of steel” for the rail line.

This is the second time I have had a work selected for the NOAA – the first time was in 2017.

Train Photo in Cochrane

(Posing next to my painting in the gallery at the Cochrane Public Library on September 13, 2019. Part of the other painting in the background is by fellow Porcupine Art Club artists and N.O.A.A. President, Bruce MacKinnon.)

The painting was matted and framed by Dale Pessah at her new store, Artsie Custom Framing, here in Timmins, and it makes its tour through the various NOAA hometowns until September of 2020, where it ends in North Bay – also home to the Ontario Northland head office.

Artists from the Porcupine Art Club selected for this year’s show:

  • Shafik Al-Hamdani
  • Ellen Catherwood
  • Cathy Cribbs
  • Karina Miki Douglas-Takayesu
  • Bruce MacKinnon

Epilogue

Just a few weeks after the opening of the NOAA show, Ontario Northland announced that there would be no Christmas train on tour for 2019, because of a shortage in staff. It is unknown whether the train will return this year.

The 63rd Annual NOAA Juried Exhibit is on from January 07, 2020 to January 26, 2020 at the Timmins Museum: National Exhibition Centre. After Timmins, the next stop on the tour is with the Ansonville Arts Club in Iroquois Falls, beginning on February 04, 2020.

Local Media Articles About the NOAA Exhibition in Timmins

  1. C.T.V. Northern Ontario’s Website
  2. The Daily Press
  3. Mytimminsnow.com (Moose FM 93.1)
Posted in Exhibits, Watercolour | Tagged , , , , , , | Leave a comment

“Sunlit Memories…”: A Process Explained

Tonight (December 05, 2019) was the opening of the Porcupine Art Club‘s themed show “Sunlight and Shadows”, which is on display at the Timmins Museum: National Exhibition Centre for the duration of December.

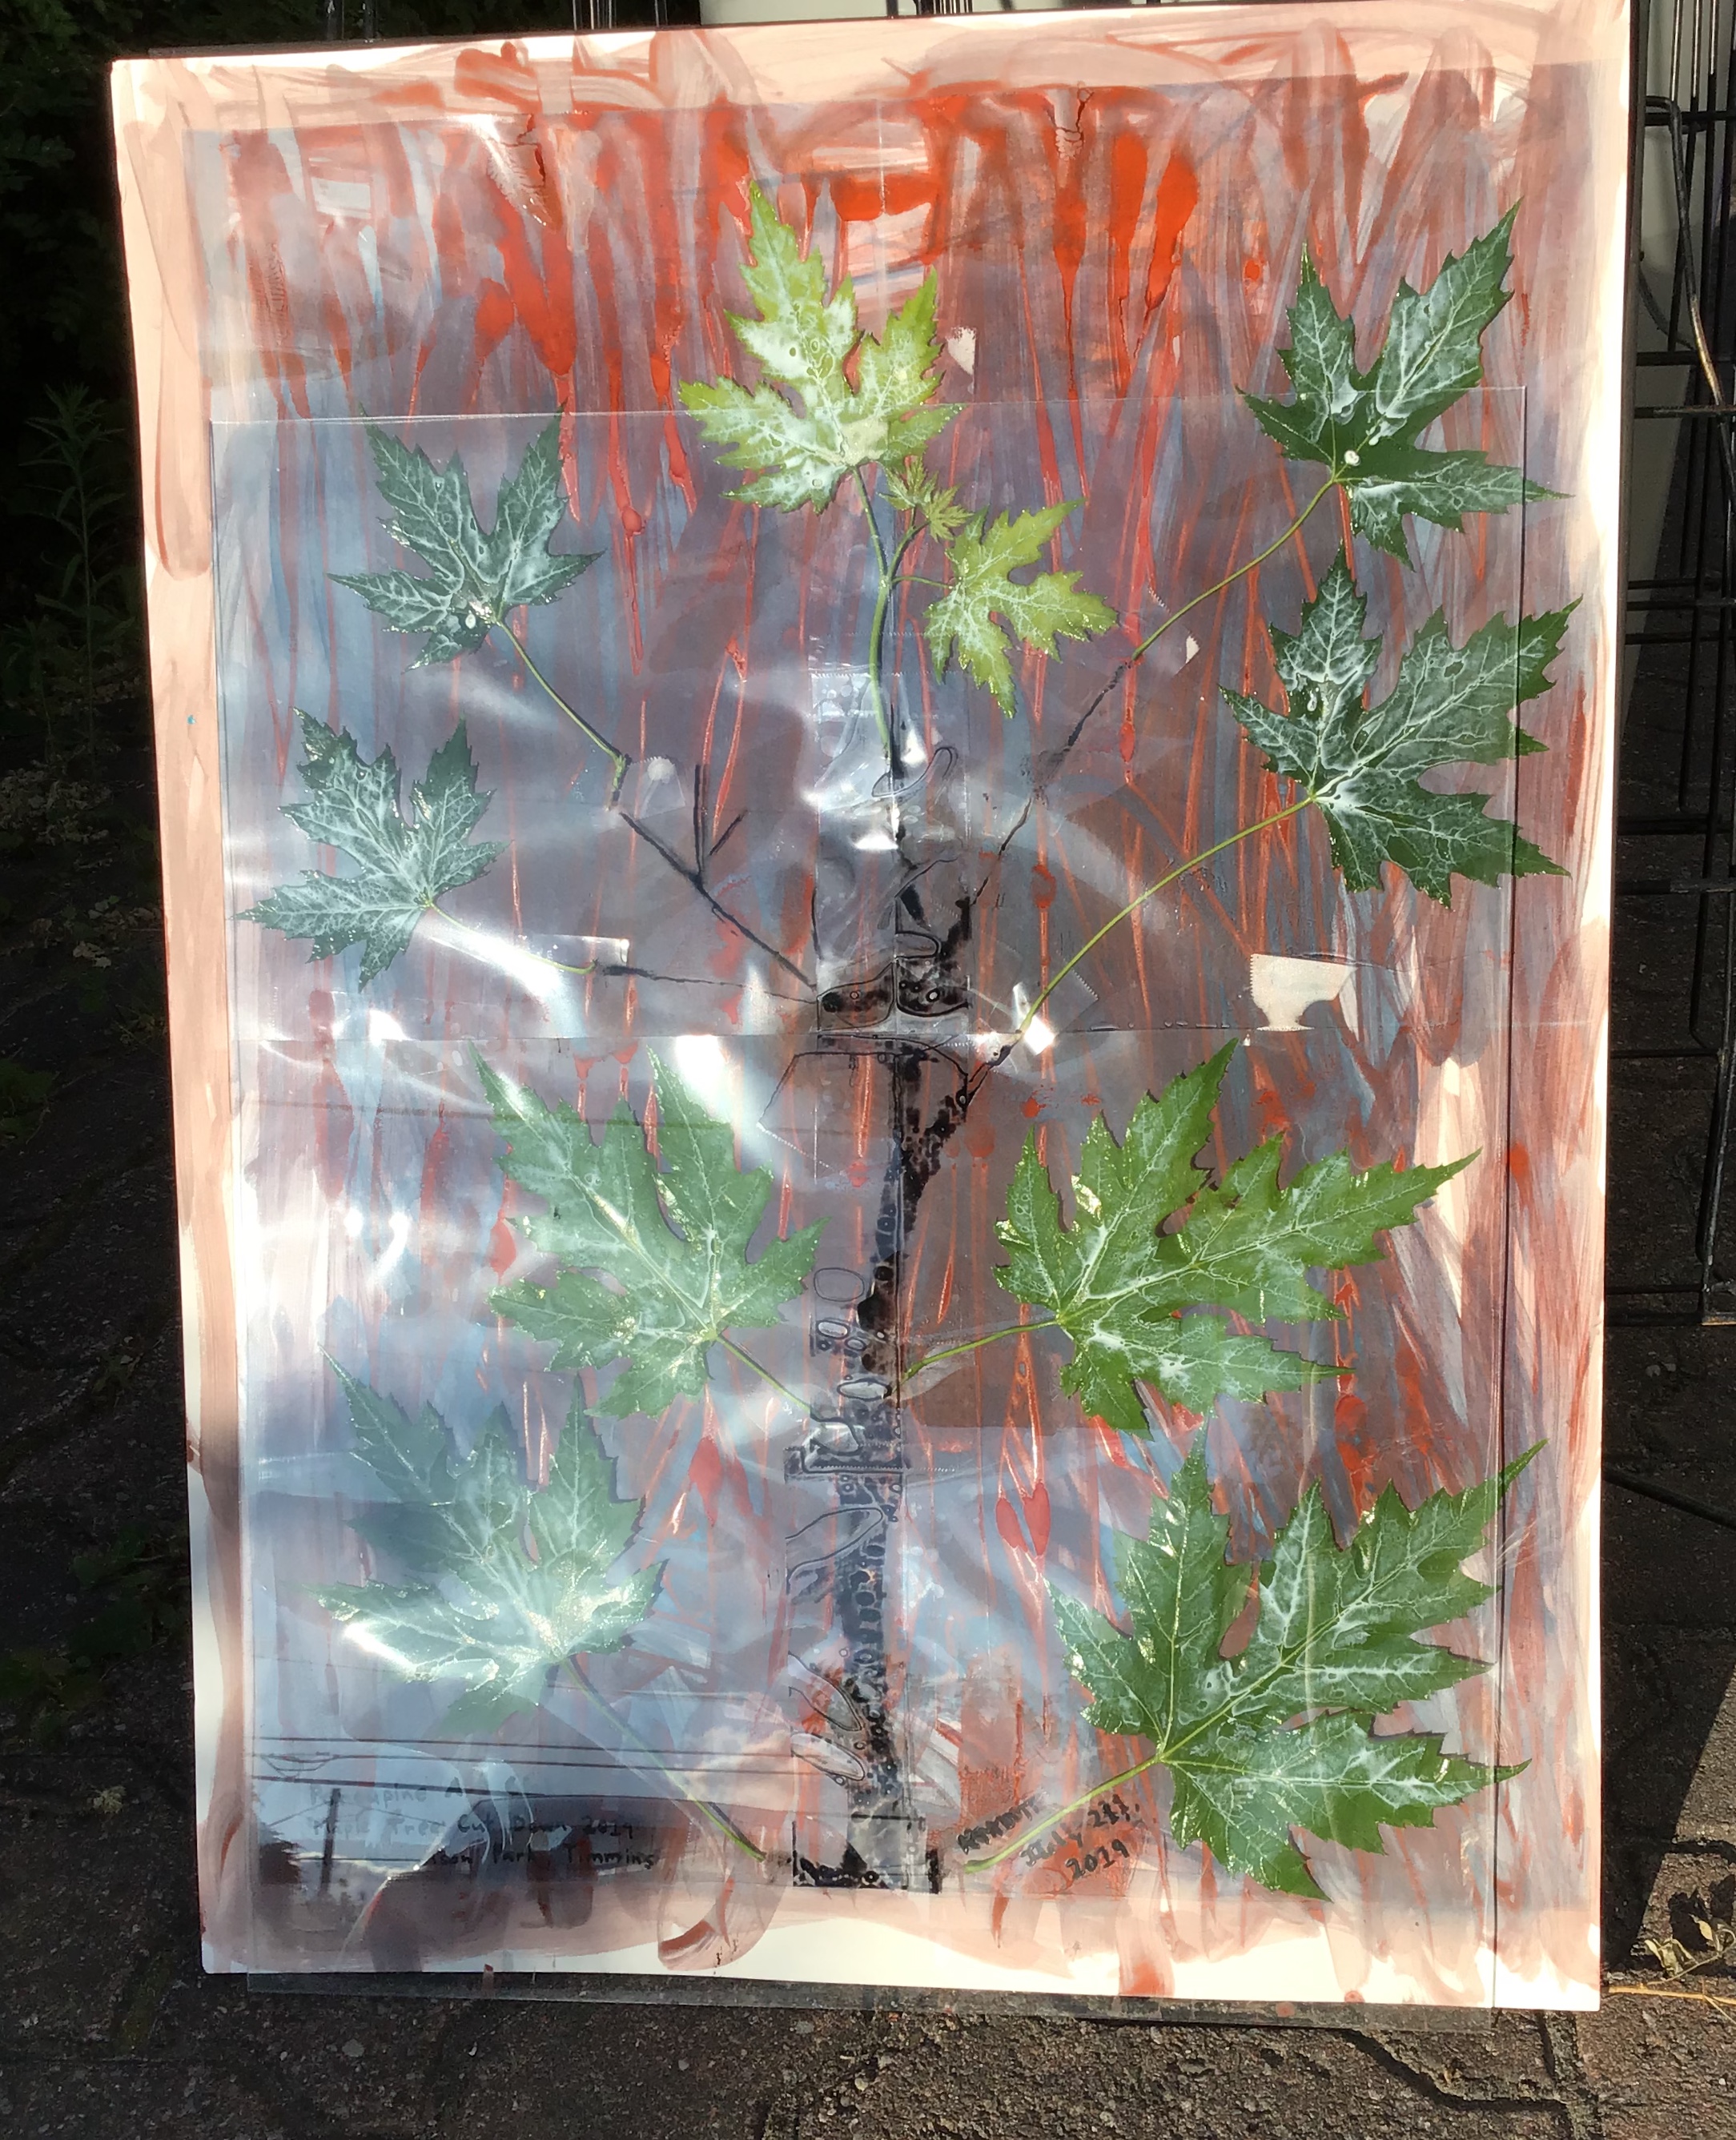
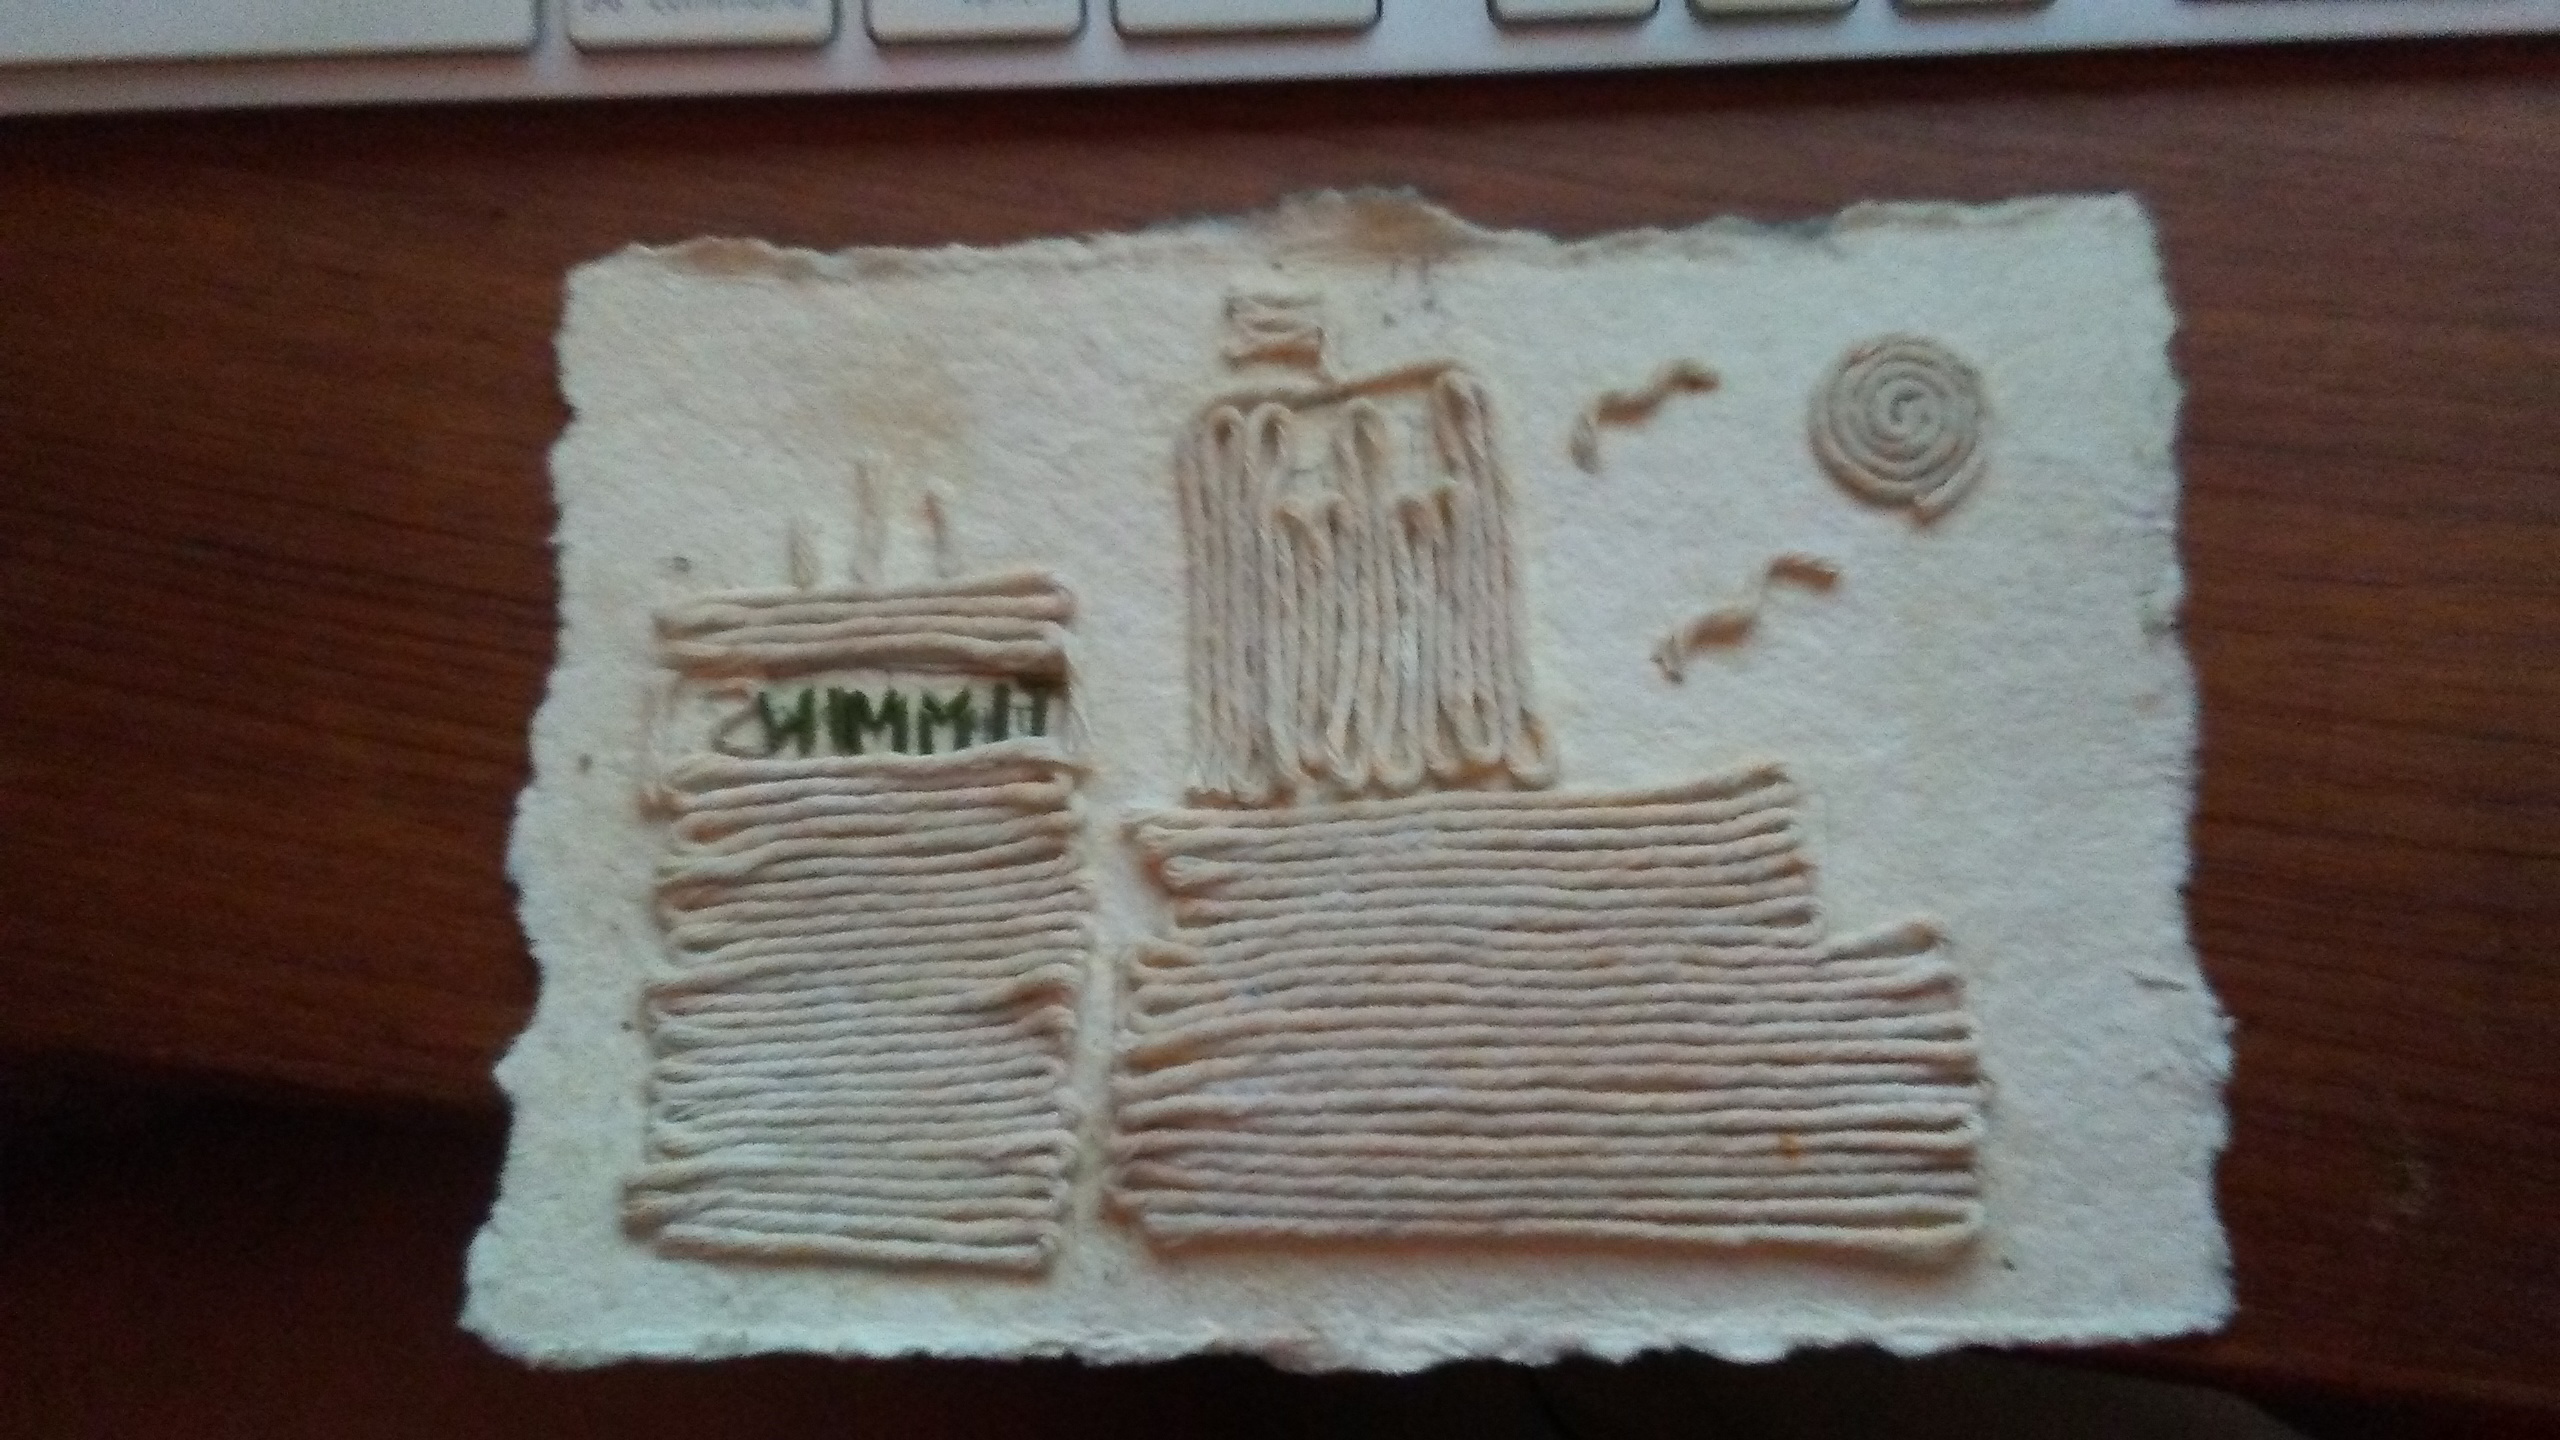
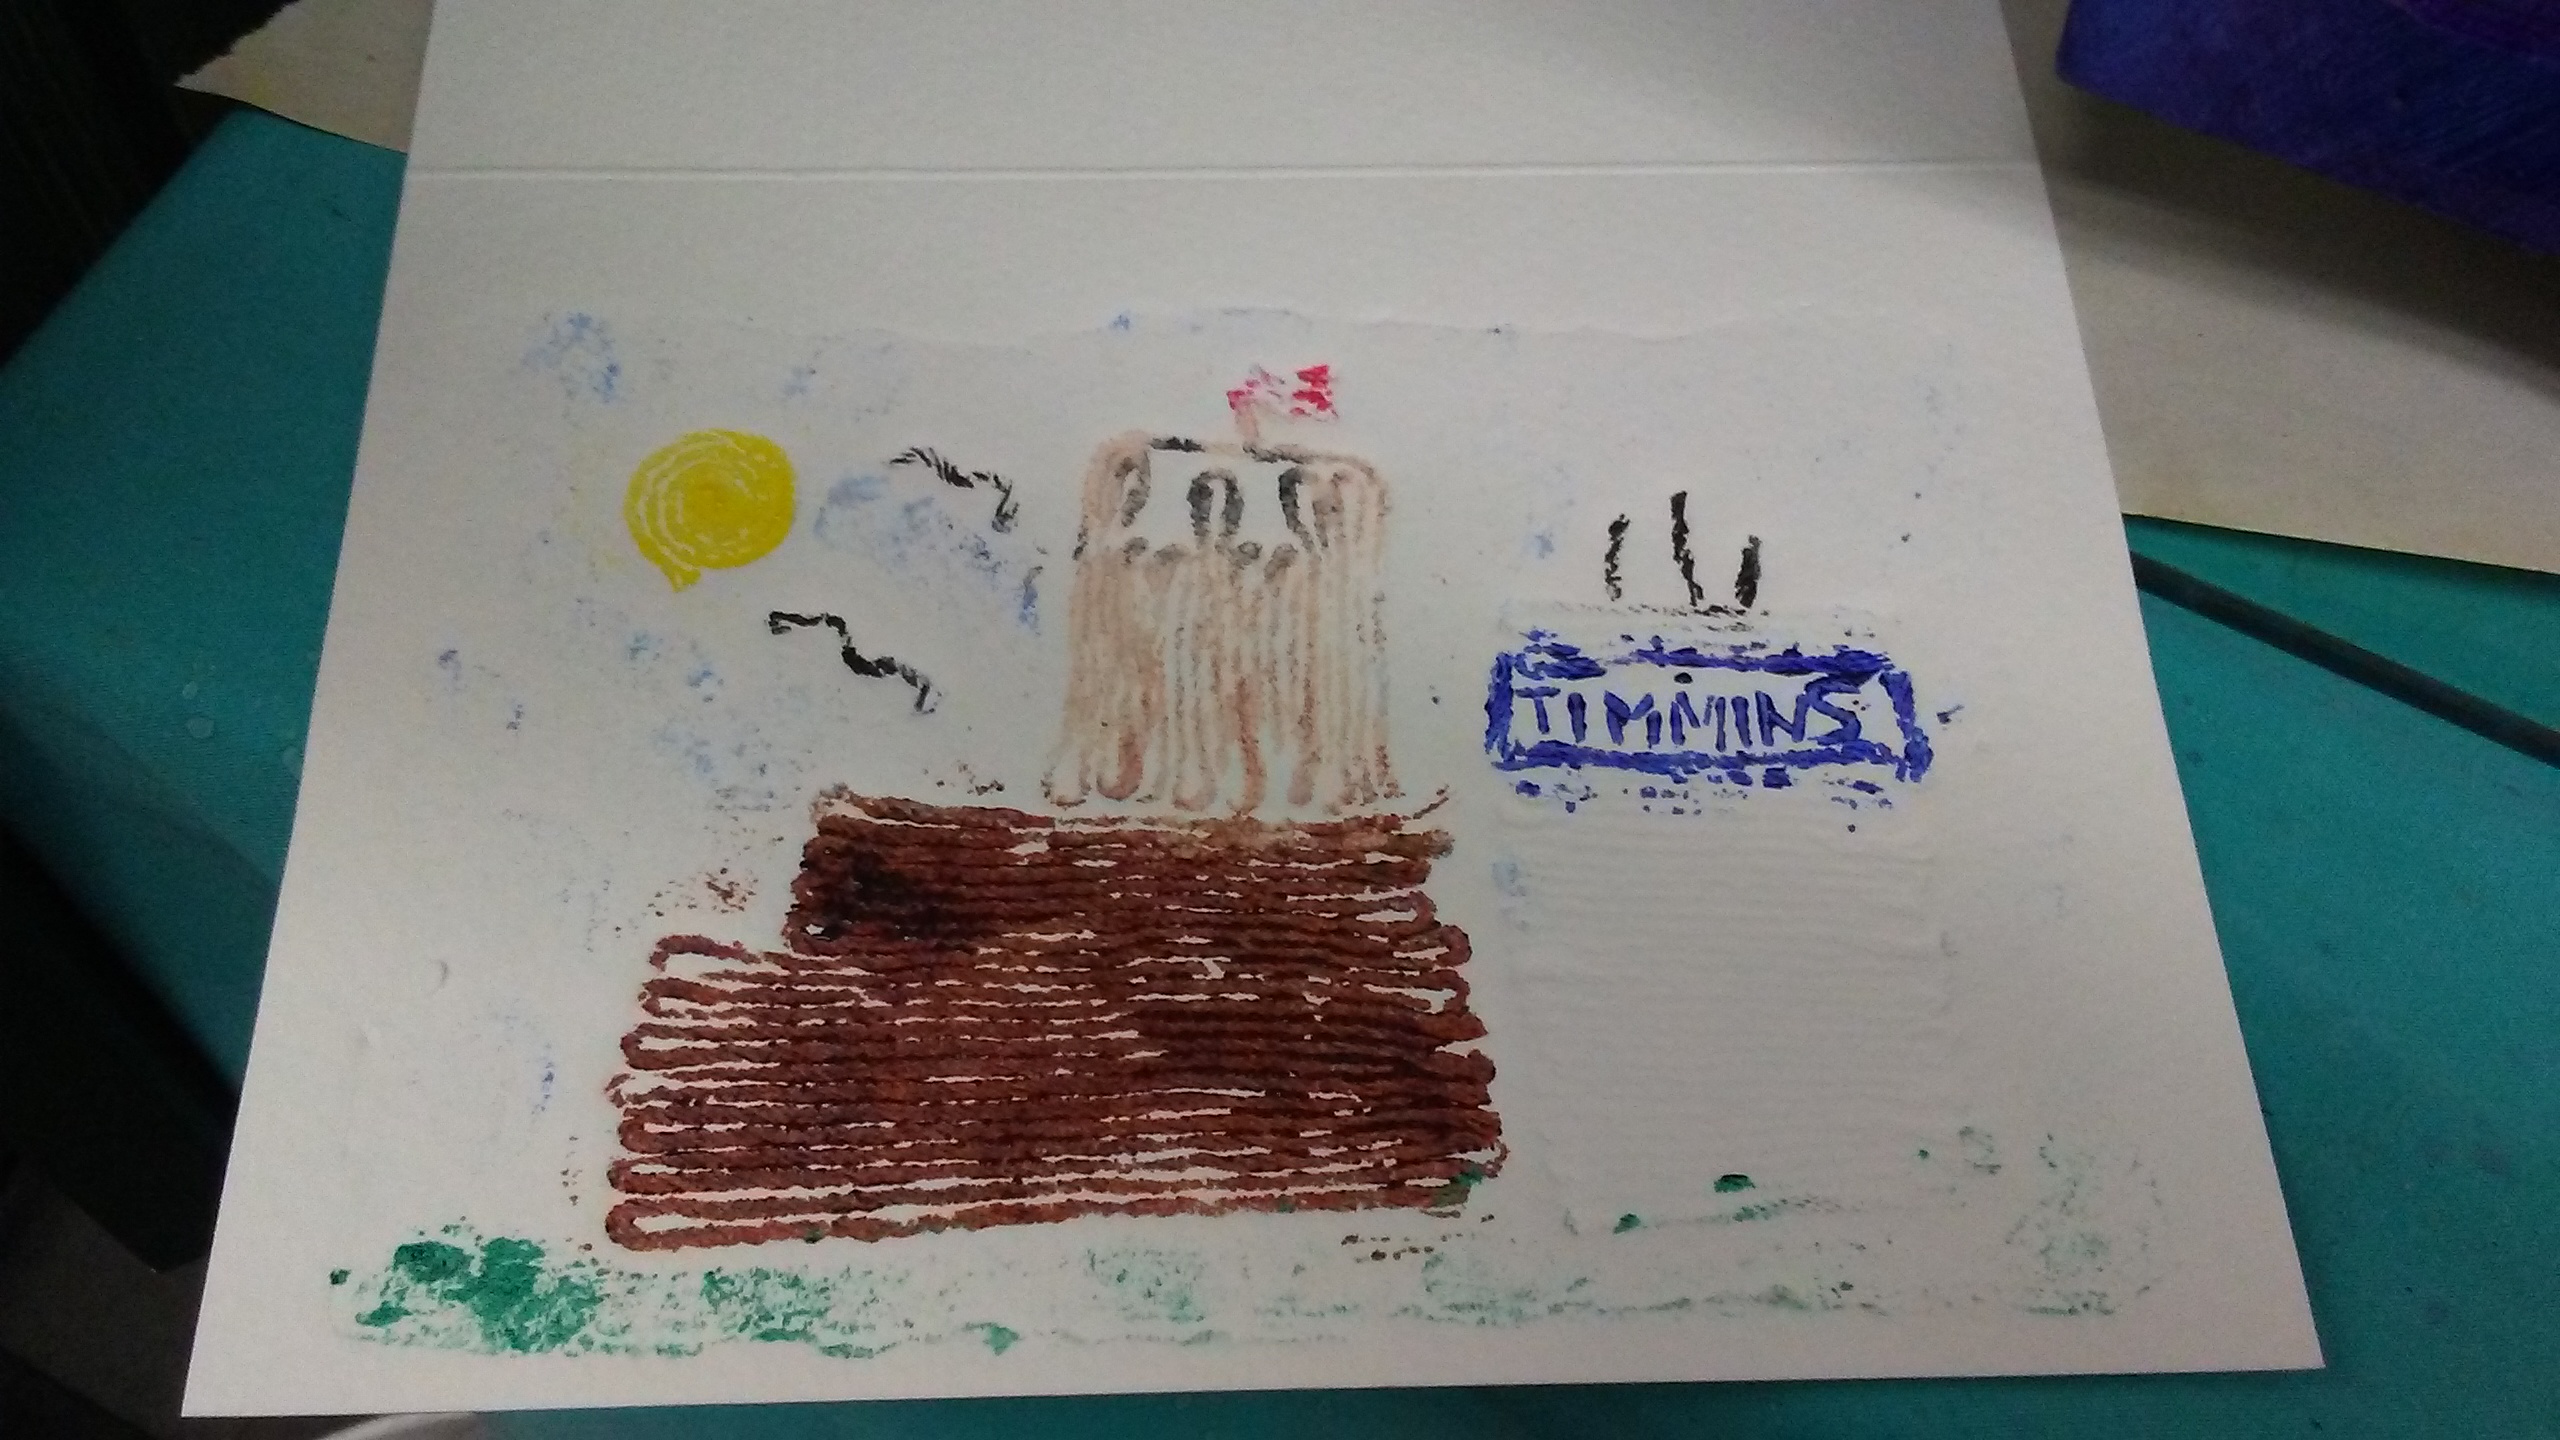
I have been member of the club since 2009, and for this show, I entered two pieces, one of which is shown below. It is an 18″ X 24″ sun print on canvas titled Sunlit Memories of the Porcupine Art Club’s Tree – 2019. It is a literal lasting impression of a large maple tree that stood in front of the clubhouse building until late July of this year, when it was determined too large and risky to keep up on public property (the clubhouse resides in a municipal park).

Many visitors to the opening of “Sunlight and Shadows” were curious about how the image was made, and I will elaborate on the process here.

LeafPrintAtMuseum

Note: At the time the description was submitted, the print was originally going to be in a glass frame, but as you will read below, that plan did not work out.

Sunday July 21st, 2019

Most of the technical work in making the print was done in the late afternoon/early evening of Sunday July 21st, 2019. Earlier on that day, the Porcupine Art Club had held its weekly Summer Sunday Open Studio, and we knew that later in the week, our tree would be cut down.

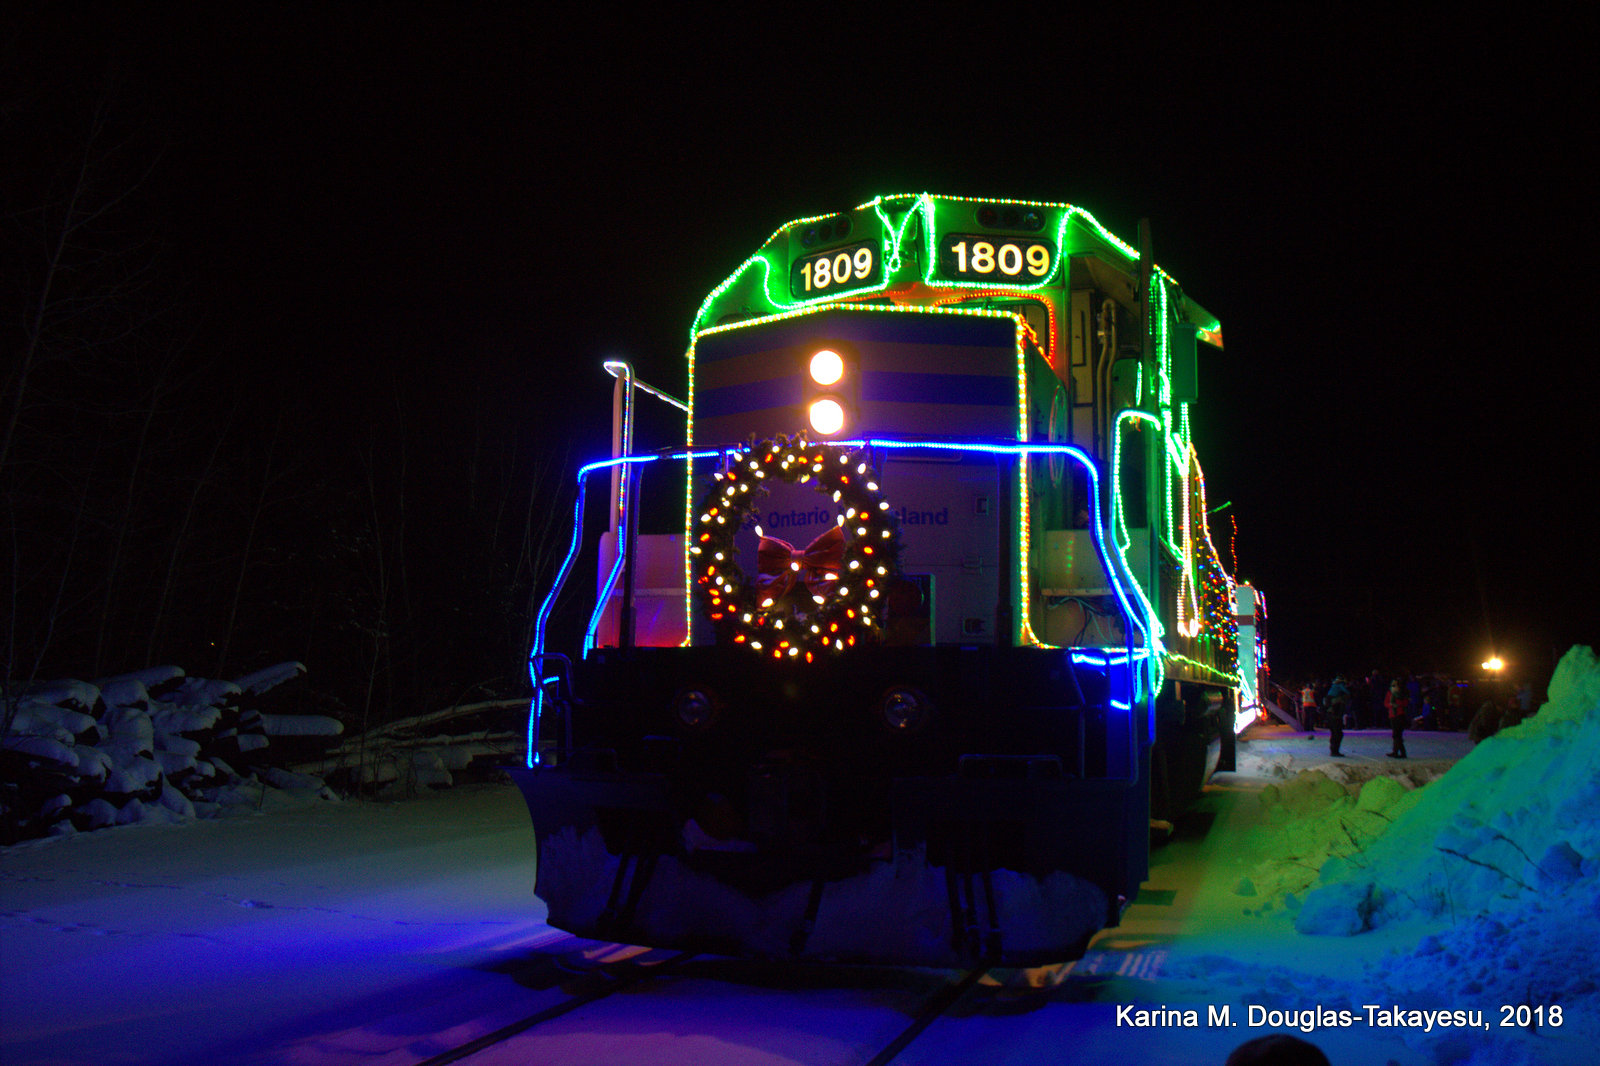
As the photograph below shows, the tree was very close to our building, as well as the power lines, and some point in the past, its branches had been cut away from the lines. The Porcupine Art Club is located in Roy Nicholson Park, which is at the intersection of Pine Street North and Eighth Avenue in Timmins.

PAC Tree

I took some final snapshots and close-up pictures of the tree, and then decided to take a few of the leaves to use for making a sun print, using a Jacquard brand Solar Fast Dye Kit I had been experimenting with earlier in the summer. These dyes are intended primarily for fabric, but can also be used on a heavier paper, such as 140lb watercolour, which is the base of my print.

One thing that surprised me about the dye is that its viscosity is more of a thick syrup than a liquid. You have to essentially scrub-paint it on to your fabric/paper.

JacquardKit

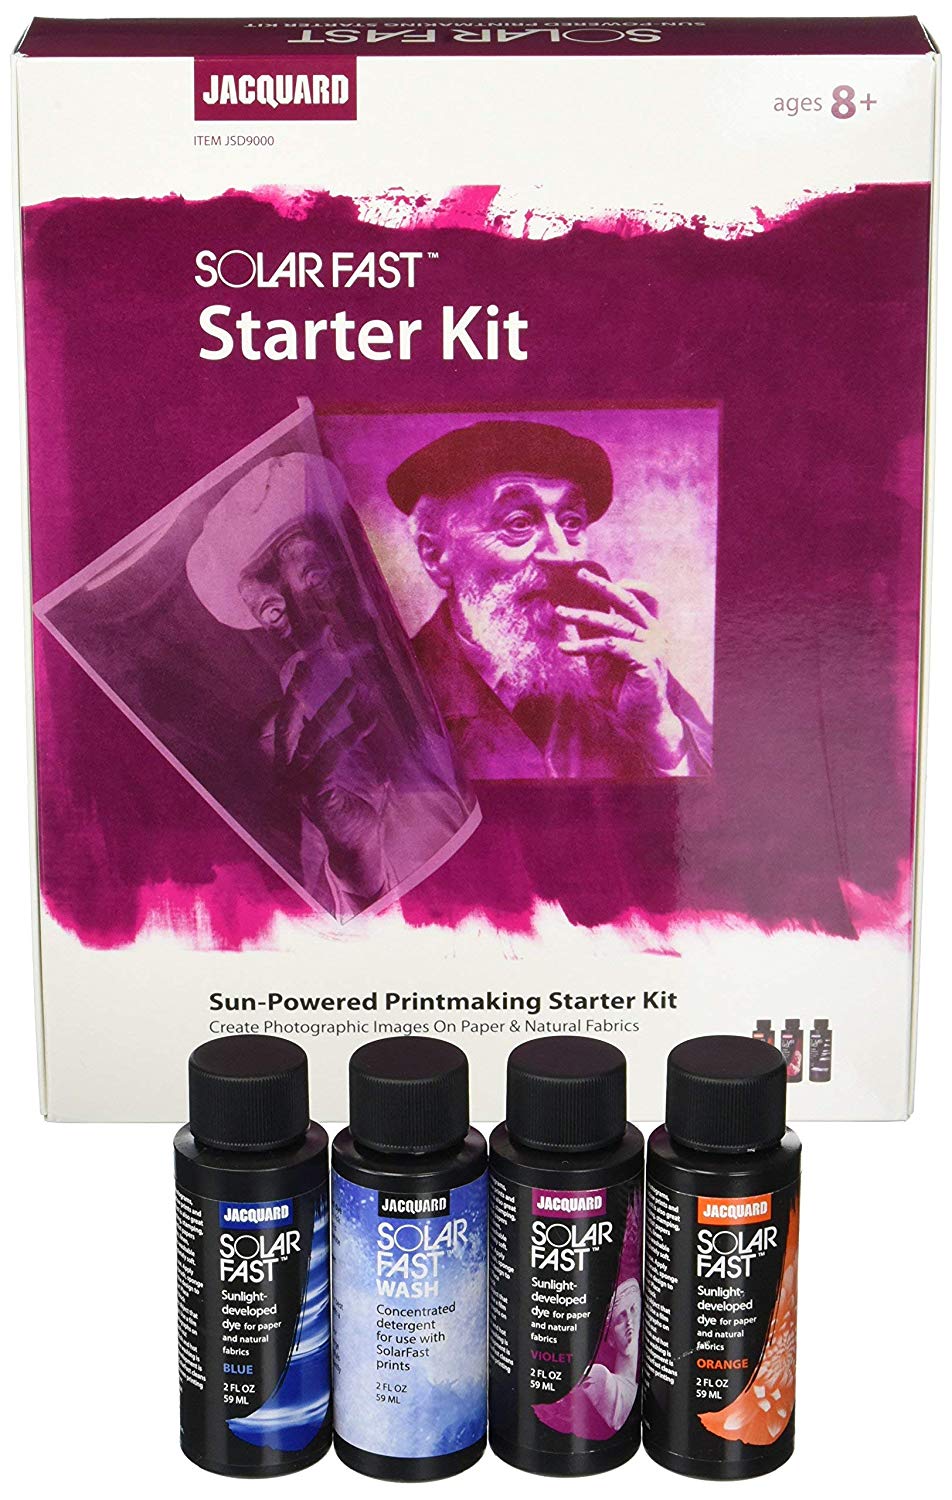
A kit like this retails about $30 to $35 Canadian at art supply stores, and can print on about 10 t-shirts.

inko-401

A similar product is INKODYE, although it seems to be harder to find in art supply stores these days, but can be ordered online.

*Caution: If you decide to buy any liquid dyes on line, do not order them in winter, because they will likely end up frozen in transit, which can ruin them.

LeafPrint_01

Since I had already experimented with the dye kit a few days earlier, and knew how it worked, I knew how I wanted to make the print. The biggest challenge with this medium is that it is a one-shot effort, and once the dye is exposed to sunlight, it starts to develop immediately. I have worked with black & white film processing and print-making, and from that experience, decided that the best approach was to create a positive plate with a composition of the leaves.

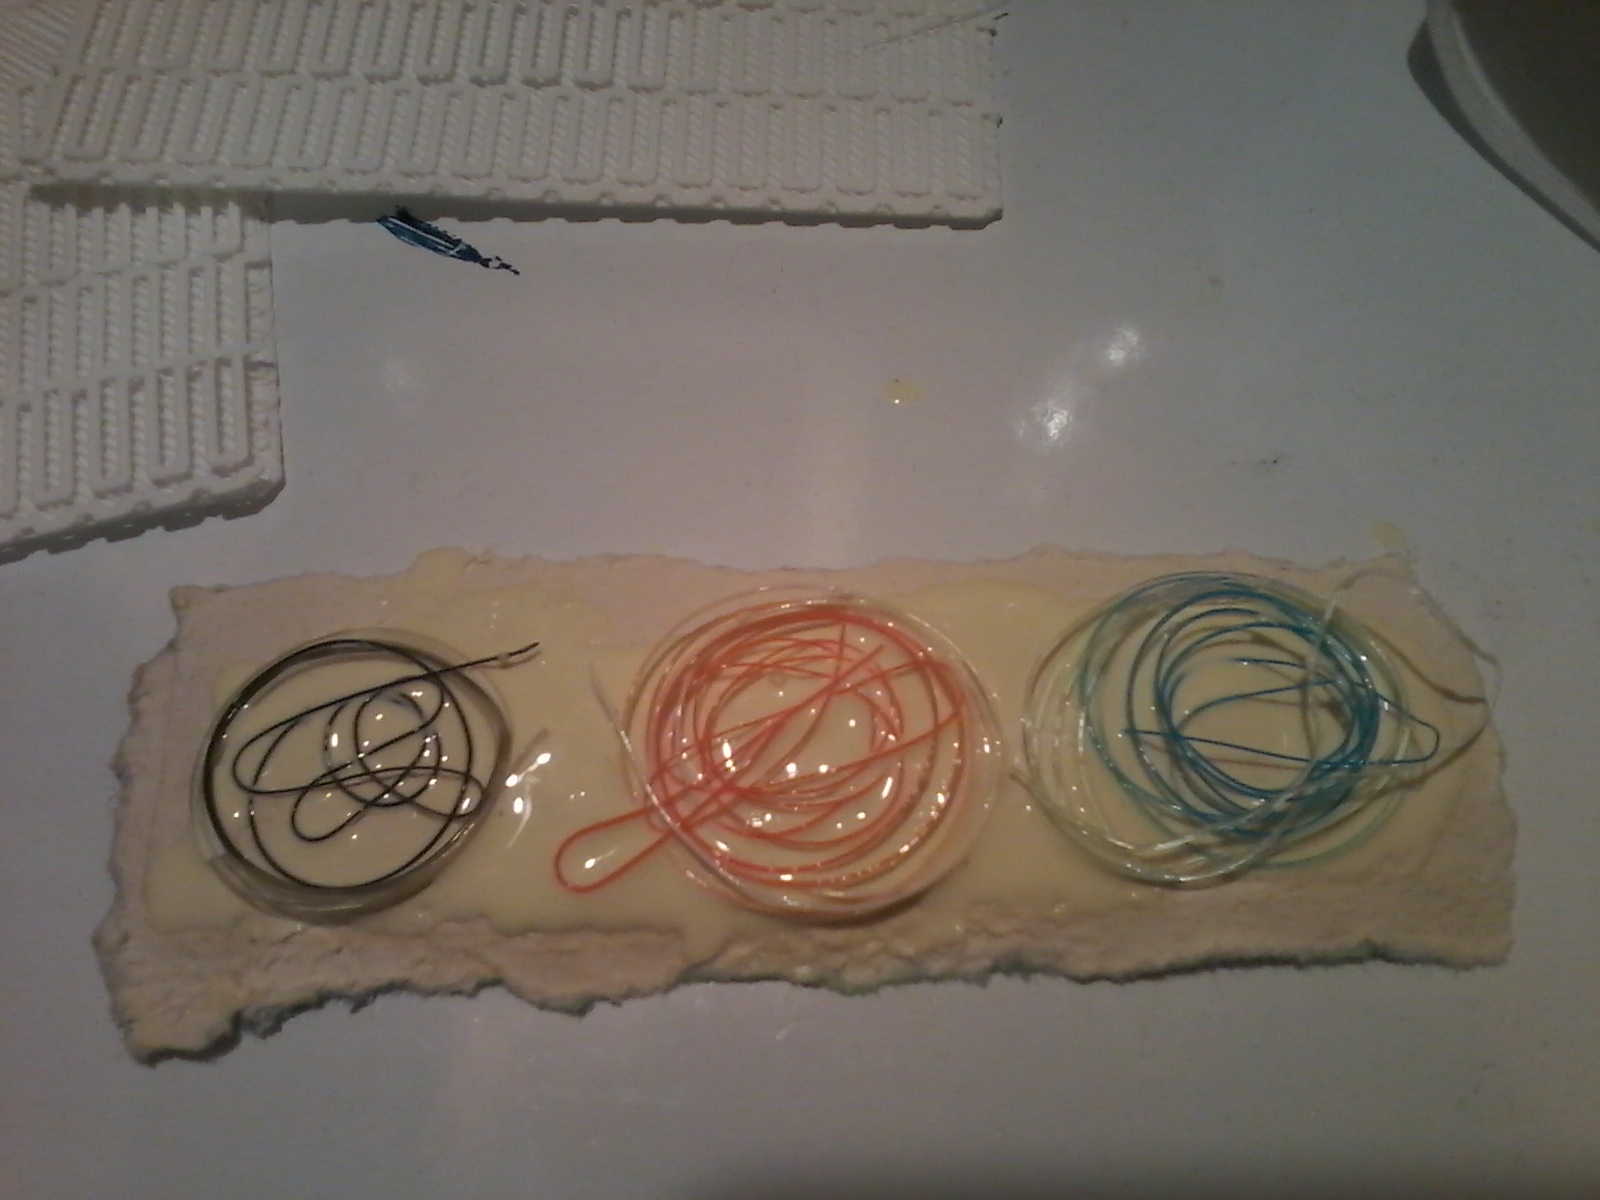
To make the plate, I used transparent tape to tack together four acetate overhead transparency films. The leaves were arranged in a pattern and glued flat, using Mod Podge. The Solar Fast Kit also included an opaque black marker for drawing on additional designs. I used that to draw in a tree trunk motif and thin twigs connecting to the leaves, as well as write in the date and a description of the image.

I prepared an 18″ X 24″ sheet of 140lb coldpress cotton rag watercolour paper in the dark in my basement. Since quite a bit of dye had been used up already, I decided to combine the contrasting remnants of orange and blue dyes on the paper. I poured out alternating pools of the dyes on the paper and smeared it around using small rectangle foam sponges that had been included in the kit, until most of the paper had been coated. I then set up the on the dye-coated surface,  and covered up everything with a black garbage bag and took it outside. The paper was also resting on hard backing to keep it flat.

Once I was in position for optimal sunlight, I uncovered everything and placed a large sheet of glass on top to keep everything flat for about 20 minutes.

As the photograph above shows, the underside of the plate was quite moist from the wet glue and leaves, and in the sunlight, the black ink sweated, creating an interesting pattern of bubbles on the “tree trunk”.

LeafPrint_02

Once the dyes had been exposed long enough, the plate was removed, and then I took the whole image back inside to wash in the laundry tub. The kit includes a special soap to help scrub off excess dye, and in order for the dye to set, it must be washed in hot water. At that stage, I had been a little too vigorous, and ended up tearing the paper in a few places.

I set everything back outside on a cardboard sheet covered with a garbage bag and let it dry out… and then I left it for a little over four months, not sure how to finish it off, or if it was worth the effort.

LeafPrintOnGround

Late November, 2019

In the week leading up to Sunlight and Shadows, I realised I had a nice frame and matte that looked to fit the paper nicely. Except, when I took the frame apart, I realised the matte was exactly 18″ X 24″, which meant all the incomplete white edges would still show up. 

Note: In the middle of all this, I decided the best way to patch up the torn paper was to tape it from the back, using inexpensive paper bandage tape, which I had bought for attaching strings when making papier-maché ornaments. The tears were also touched up with coloured pencils to blend them in better to the background.

Paper Bandage Tape


At the proverbial eleventh hour, I took an 18″ X 24″ painting on canvas, which I knew I would not complete, and glued/laminated the print to the canvas. I then used more paper tape along the edges to make and border, and to force the print to stick to the canvas. After letting everything dry under a sheet of glass overnight, I painted the “frame”, using Artist’s Loft Pthalo blue. Everything was then sealed off using Liquitex Gloss Varnish. In the end, the sun print worked out much better than anticipated, and it has been quite the conversation piece.


Posted in Exhibits | Tagged , , , , , | Leave a comment

Three Night Sky Scenes at Grundy Lake Provincial Park: June 30/July 01, 2019.

During the Canada Day long weekend, the Sudbury Astronomy Club hosted their New Moon Star Party in Grundy Lake Provincial Park near Britt, Ontario. The evening of June 30/July 01 was clear, although heavy with dew. I took a few pictures at the beach beside the amphitheatre, where the club had set up some telescopes for public viewing, and then at 2:24 a.m., I took my camera out on a rock overlooking Gurd Lake, beside the Hemlock campground, and lucked in to catch some Aurora Borealis.

IMG_1315-2

Sagittarius, the Milky Way, and Jupiter, as seen from the beach by the amphitheatre.

IMG_1313-3

When white light gets into your scene – headlights illuminating foreground trees; fortunately, they added a surreal artistic effect to the scene.

IMG_1324-2

Aurora Borealis and some of the Milky Way, as seen by Gurd Lake at 2:24 a.m. on Canada Day.

Posted in Photography | Tagged , , , , , , | Leave a comment

Some Views of the Total Lunar Eclipse with Landmarks on January 20-21, 2019

Timmins was in the path of the Total Lunar Eclipse of January 21-22, 2019. This was the first total lunar eclipse visible since September 27/28, 2015. (There was one on January 31, 2018, but it was overcast and snowing here.) The next total lunar eclipse will not occur until May 26, 2021. This time, the sky co-operated, but the temperature was below -40ºC.

Since I have been fortunate to photograph both a total lunar and a total solar eclipse sequence up close, I decided to photograph some landscape scenes at totality. I decided not to risk having a frozen car, and instead bundled up in four layers and set out on foot from my house to the Hollinger Mine headframe about 2 kilometres away, and make my way from there back home. I was out for over two hours and walked a good 4 kilometres. Amazingly, the camera and battery stayed operational the whole time.

I was not sure where I would end up for my landscapes, and did not feel like switching lenses in the cold; therefore I just stuck with the kit 18-200mm on my Canon EOS 60D. In addition to a cable release, the only other equipment I carried out was my tripod.

The Hollinger Mine Headframe and Canadian Flag at Totality

img_9815-2

The concrete headframe from the original Hollinger Mine site still stands today. Just to the southeast is the berm surrounding the Hollinger Open Pit project run by Goldcorp, which continues to mine on the site. The Canadian flag, if it is still the same one that was placed on top just before Canada Day 2018, is one that flew on top of the Peace Tower in Ottawa. (Daily Press Article About the Flag) Normally, the flag is only on the headframe in early July, and maybe as late as August some years, but this year, it appears that it was never taken down or exchanged.

Handheld Close-up Shot of the Moon

img_9833-2

It was too cold to attempt fiddling around with the camera too much. I picked both it and the tripod up (grabbing the ONE UNINSULATED LEG) to get a quick (and blurry) handheld shot of the red moon up-close.

Lunar Eclipse and Water Tower

img_9819-2

The water tower is a few metres south of the Hollinger Headframe on Water Tower Road, but it was impossible to get the headframe and water tower together (or as I dub it, the “Timmins Skyline”) with the moon. The water tower has had the dark blue band and lettering in white since at least 2014. Prior to that, it was completely white, with TIMMINS in dark blue letters.


Lunar Eclipse and Orion Constellation 

img_9829-2

Going a few metres further southeast on Water Tower Road, back towards Brunet Road and Food Basics grocery store, I was able to get a wide-angle shot with both the eclipse and the Orion constellation in it. Although the scene looks straight, it required having the camera at an angle to fit everything in without getting the city lights and power lines in the picture.

Total Lunar Eclipse Over the Hollinger House at the

Timmins Museum: National Exhibition Centre

img_9839-pano-2

The Hollinger House that resides by the Timmins Museum National: Exhibition Centre is a reconstruction of two Hollinger Houses with a modern roof. The reconstruction was spearheaded by local historians Diane Armstrong and Norah Lake, and it resided at the site of the Hollinger Mine tour until 2013 when the site was demolished for the open pit. The house was transported by a flatbed truck in September of that year and now resides at 225 Second Avenue. The Hollinger Houses were originally constructed as affordable housing for the miners and their families, starting in the 1930s. There are still some original houses left, but they have been renovated over the years and look more contemporary.

This is photograph is actually a two-picture composite, stitched as a vertical panorama in Adobe Lightroom. In order to get the top of the fencing with the Christmas lights and the moon in the same shot with an 18mm focal length (1.6 X crop factor to 28.8mm), I had to take two pictures and stitch them as a panorama. Although I could have walked back further on the street to get the picture, the City of Timmins was doing snow removal at the time, and I did not want to risk walking into the path of oncoming heavy equipment. The machinery had already past this section of the street, but could have come back.

Eclipse And Prospector Statues at the Museum Site

img_9846

As part of Timmins’ 100th Anniversary commemorations, three bronze statues were unveiled in 2012, depicting three of the City’s founding prospectors: Jack Wilson, Sandy McIntyre, and Benny Hollinger (from left to right in this scene). It is hard to photograph the statues in winter, because the area is quite brightly lit and surrounding by parking lots, along with a Beer Store half a block away. The trees were added behind the statues a few years ago.

Total Lunar Eclipse Over the Timmins Public Library

img_9857-2

The last stop of the night was in the parking lot of the Timmins Public Library at 320 Second Avenue. The library was founded in 1921, opened its doors to the public in 1924, and resided at 232 Fourth Avenue / Algonquin Boulevard East until late 2004. In April of 2005, the Library opened its doors at the present location. The building is an integrated services building and has two street addresses – 320 & 330 Second Avenue. It was designed by ANO Architects/PBK Artchitects here in Timmins, and incorporates many wood elements on the interior. The main library room is over 20, 000 square feet in size, and to give an idea of the size, the object that looks like a finger pointing downwards in the second window is a birch bark canoe, about 12 feet long, suspended from the ceiling. The handmade canoe was donated by members of the Métis Nation of Ontario – Timmins a few years after the library opened.

Posted in Photography | Tagged , , , , , | Leave a comment

Experiments in Collagraphy

20180805_182520

The other day, Porcupine Art Club Director and fellow artist Catherine Cribbs, held an informal workshop with some club members on making collagraph plates for printing. (Catherine is also avid print-maker – among her various other media she works in – and she was the one who taught me linocut in 2011.) Collagraphy, is a form of printmaking that uses plates made of a thicker paper or cardboard, on which various flat, but textured media are glued down – essentially creating a collage, but instead of the collage being the final work of art, it becomes the tool for making more art.

20180801_135243

For my first attempt, I experimented with gluing string down on a piece of scrap watercolour paper that had been torn up to roughly 4 X 6″ in size. The edges are kept rough to give nice aesthetic to the print, rather than a forced straight border.

I penciled in a very rough outline of the Hollinger Headframe and Timmins water tower, making sure I had the scene lined up backwards. For the lettering, I broke up a couple of white pine (?) needles, and carefully glued them into place. The S was too complex for the rigid pine needles; therefore, I used a piece of string. Originally, I had built up the water tower from one continuous length of thread glued down, but then the lettering became to wide, and I had to pull up the string and lay down a fresh one. Working without tweezers on such fine detailing took a good two-and-a-half hours.

20180805_003029

A few days later, I painted over both the front and the back of the plate with white acrylic paint to seal up everything. I had to first move the second I in TIMMINS, because it was butted up right against the edge of N.

20180805_003035

While thinking about textures, I decided to experiment with the scrap rafts I had from many 3D printing projects. (When using a fused deposition modelling 3D printer, you generally have to switch on the option for “rafts”. The printer then extrudes 6 layers of melted filament to build up a foundation on the build plate before starting the 3D model. The raft will always take on a bit of the shape of base face of the model, and sometimes on a flat shape, such as a stamp, the raft can take up to 40% of the total build time of the model, only to be discarded if it cannot be recycled.) I dug through my bucket of scraps and found the raft from when my husband had styled a “Courage” medal when he played the Cowardly Lion in The Wizard of Oz in 2016. Since I had torn up a 6-inch square of the scrap watercolour, I decided to glue the medal raft to it. The first layer of the raft is always a set of rows of interesting continuous lines made up of a repeating squared-off S-shape, and I chose that to be the side that would be inked.

20180805_001346

Additional scrap I also collected were the coiled “threads” of filament produced when I changed filament reels. In order to make sure the filament was feeding through the extruder properly, and to flush out the contamination from an old colour to a new colour, I ran the filament through the extruder anywhere from 30 seconds to a minute, which resulted in a coil of filament that would harden on the build plate. Since these created an interesting shape and a stringy texture, I glued three of them down to a bookmark form. I used wood glue for this, since I did not have PVA white glue handy.

Inking and Printing

20180805_141726

Once all the plates had been designed, sealed, and dried, the next part was inking the plates for the printing press. Since the brayer would be too rough on the collage materials, and the ink would not get into all the detailed areas, the artists made “poupées”, little pieces of cloth stuffed with a cotton ball and tied up firmly with an elastic band (i.e. like a fabric doll or puppet’s head). The poupées were then dipped in various colours of oil-based printing ink (similar in viscosity to oil paint), and the ink was dabbed over the different sections of the collagraph plate. Usually, I tend to print in black or a single colour, but I decided to experiment with a full colour plate for the first couple of print runs.

20180805_143244

The first attempt was run through the printing press on to a 5 X 7″ 140 lb watercolour greeting card. I decided not to use white ink for the water tower, since the paper was quite bright white. The impression was not too bad, but the colours made the image look more like a child’s drawing than a print.

20180805_143238

I tried a second full-colour version with an old piece of watercolour paper that was close to beige. I used white ink on the water tower and ran it through the press. Again, the result looked more like a child’s painting than a print.

20180805_182520

For my third attempt, I used black ink over the plate (not cleaning off the colours that were underneath), and was much happier with the result, which looks like a print. Since the ink is oil-based, the print can later be enhanced with watercolour paints, if desired.

20180805_182459

20180805_182431

I ran some colour experiments with the 3D filament “thread coils” and liked the results…

20180805_182547

… I ran a “blind print” (that is, an uninked plate, which makes an embossed image) of the 3D medal raft, but did not make any inked prints…

20180805_150349

… and, I also made up an adjustable plate out of 3D printer raft scraps. I took a white backing, removed the “S” track layer, and taped on a circle with a bump from a Christmas ornament, a sort of cartoon bus shape from printing off a model Hollinger House on its side, and I overlaid a line of the “S” track on the bottom, to create ground. The scene was designed to be hot air balloon flying over a field.

20180805_182407

The first print ended up with quite a bit of ink bleeding from the “S” track being larger than the plate, and the background had not been inked, but some traces of ink had transferred the lined pattern on to the print.

20180805_154809

For the second attempt, I removed the “S track entirely, and inked up the background plate to look like sky and ground. I then taped the balloon and basket layers on, after inking them up with red, and brown respectively. This created a much better, and more interesting print – some larger squiggly lines on the edges are from where parts of the “S” track layer remained stuck to the raft.

Overall, my first attempt at collagraphy was successful, and it has also given me a good use for the scrap 3D printer rafts I collected up over the last three years.

Posted in Technique Experiments | Tagged , , , , , | Leave a comment

A View Inside SNOLAB (Sudbury Neutrino Observatory)

In early May of 2018, I applied to the Sudbury Neutrino Observatory`s first-ever Physics Photowalk Tour to be held in June. The physics photowalk is a worldwide event in which various facilities, such as CERN and Fermilab, open their doors to a selected of photographers, who are then allowed to explore around the facilities (under guidance for safety) and take photographs, presenting a new and creative few of the research environment to staff, scientists, and the public. I learned on May 18 that I was selected as one of the 20 photographers to visit the Sudbury Neutrino Observatory, which has been in operation for nearly 30 years 6800 feet underground at the Creighton Mine site in Lively, Ontario (just outside of the main City of Sudbury). The original SNO experiment, which gave insight into the properties of neutrinos and the core of the Sun is complete, and resulted in the 2015 Nobel Prize in Physics being awarded to Dr. Takaaki Kajita from the University of Tokyo and Dr. Arthur B. McDonald of Queen`s University in Kingston, Ontario. (An overview of SNO can be read here: “https://sno.phy.queensu.ca/).

Many other international collaborative experiments have been completed or are in progress at the facility and cover not only physics and astrophysics, but also biology. (E.g. FLAME – Fruit fLies in A MinE., which Dr. Thomas Merritt of Laurentian University is conducting to see the genetic and metabolic effects of the mining environment on the body, using fruit flies as the human analogue.) In addition to SNOLAB, the site is also an active nickel mine that operates down to over 8000 feet underground.

To give you an idea of the scale of the research facility, this is one chamber called the Cryopit, which is several stories high. This image is a composite of 30 20-mm focal-length photographs taken on a full-frame (35mm image sensor) DSLR. The images were merged in Adobe Lightroom on a cylindrical project. I left the edges uncropped, because I felt they added a dramatic touch to the scene.  #PhysPics18

CryopitPanoramaSmall

Posted in Photography | Tagged , , , , , , | Leave a comment

Aurora Borealis May 07, 2018

The solar activity was elevated starting on May 05th  to around May 08, 2018. This photograph was taken around 1:00 a.m. on Monday May 07th, 2018 in Dana-Jowsey Lakes Provincial Park, approximately 30km west of Timmins. There were some clouds that night, and the pink on the right side of this picture would be the lights reflecting from Lakeshore Mine near the Highway 144 turn-off.


IMG_4414


Posted in Photography | Tagged , , , , , , | Leave a comment

Miniature Robin’s Nest in Clay

RobinEggMiniature.jpgThis is a free-from, hand-built stoneware piece I made in Linda Guiho’s pottery studio on January 30, 2018. The scene is a robin on the edge of her nest with one egg and a hatchling (not seen from this angle), which sits in an egg (approximately to scale with an actual robin’s egg) on a stand. The model is resting on my knee in this picture with a quarter for scale. I photographed this with a tablet that has a low-resolution, non-focusing camera.

Posted in Miniatures, Pottery | Tagged , , , | Leave a comment